If you plan to customize the GNOME Shell in any meaningful way, you need to understand the technologies underlying the GNOME Shell and understand how to write a GNOME Shell extension to provide the customization that you require. In this post I delve deeper into the technologies behind the new GNOME Shell and provide sample code for a number of simple extensions which demonstrate how to customize and extend various components of the GNOME Shell user interface.
Essentially, the GNOME Shell is an integrated window manager, compositor, and application launcher. It acts as a composting window manager for the desktop displaying both application windows and other objects in a Clutter scene graph. Most of the UI code is written in JavaScript which accesses Clutter and other underlying libraries via GObject Introspection.
Here is a block diagram of the underlying technologies that support the GNOME Shell as of v3.0:
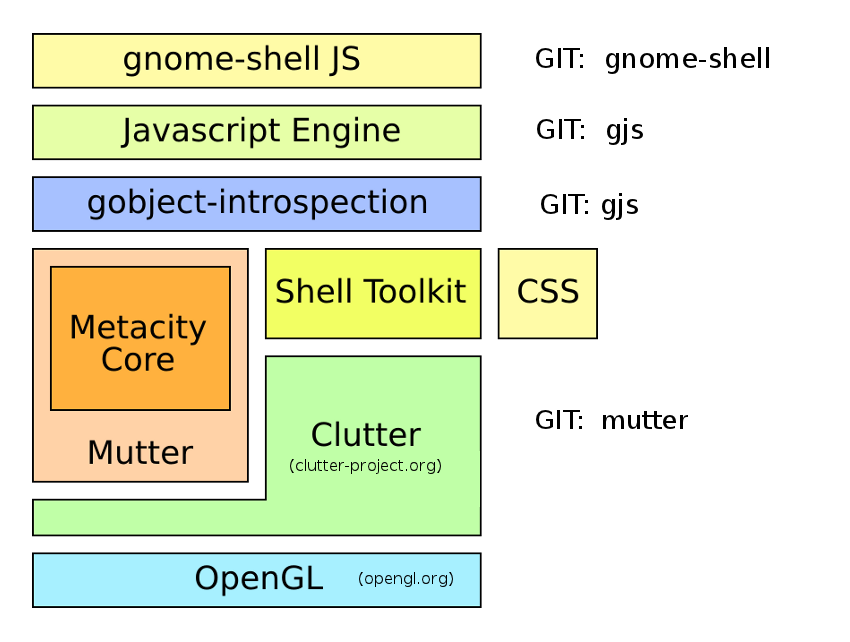
This is a modified version of a diagram that exists on the GNOME website.
The GNOME Shell uses OpenGL to render graphics. OpenGL uses a hardware accelerated pixel format by default but can support software rendering. However, hardware acceleration is required to run the GNOME Shell as it uses a number of 3D capabilities to accelerate the transforms. Most graphics cards less than 3 years old should support hardware acceleration. If hardware acceleration is unavailable, the GNOME Shell defaults back to a modified version of the GNOME 2 Panel. See Vincent Untz’s post for further information on this fallback mode. In addition, you can force the GNOME Shell to use the fallback mode via a switch in the Settings, System Info panel. Whether a graphics card supports hardware acceleration or not is determined by a helper application /usr/libexec/gnome-session-is-accelerated which returns either 0 or 1. Another limitation in the 3.0 version of the GNOME shell is that the total horizontal or vertical pixel count of all your monitors must be less than 2048.
int
main (int argc, char **argv)
{
        Display *display = NULL;
        int      ret = 1;

       display = XOpenDisplay (NULL);
        if (!display) {
                _print_error ("No X display.");
                goto out;
        }

        if (_has_composite (display) != 0) {
                _print_error ("No composite extension.");
                goto out;
        }

        if (_has_hardware_gl (display) != 0) {
                _print_error ("No hardware 3D support.");
                goto out;
        }

        if (_has_texture_from_pixmap (display) != 0) {
                _print_error ("No GLX_EXT_texture_from_pixmap support.");
                goto out;
        }

        if (_is_max_texture_size_big_enough (display) != 0) {
                _print_error ("GL_MAX_TEXTURE_SIZE is too small.");
                goto out;
        }

        ret = 0;

out:
        if (display)
                XCloseDisplay (display);

        return ret;
}
As you can see, the use of gotos is alive and well! If you are certain that your graphics card supports hardware acceleration but for some reason GNOME Shell only works in fallback mode, try replacing this application with a script that simply returns true. There is also a black list of graphic cards. According to Emmanuele Bassi:
the hard limit is on Intel 915/945 integrated graghics (which are sadly what netbooks generally use). The limit also used to exist on 965 but it was a soft limit that was lifted by fixing the driver in Mesa
You can also force the fallback mode using a gsettings key:
$ gsettings set org.gnome.desktop.session session-name gnome-fallback
Access to OpenGL is via Cogl which is a graphics API that exposes the features of 3D graphics hardware using a more object oriented design than OpenGL. The Clutter graphics library handles scene graphing. In Clutter, widgets are called actors, and windows are called stages. A Clutter application contains at least one stage containing actors such as rectangles, images, or text. A useful online resource for Clutter programming is Programming in Clutter by Murray Cumming. By the way, the Clutter library is also used in Moblin which, along with Maemo, is now part of Meego. Meego uses MX widgets on top of Clutter (a useful tutorial can be found here) whereas the GNOME Shell uses a Shell Toolkit (St) which implements many custom actors, such as containers, bins, boxes, buttons and scrollbars that are useful in implementing GNOME Shell UI features. The Shell Toolkit was derived from the Moblin UI Toolkit. See ../src/st in the gnome-shell GIT source code repository. The Shell Toolkit also implements CSS support (see ../src/st/st-theme*) which makes the GNOME Shell themeable. Generally if you see any object whole name starts with St. you can assume you are dealing with the Shell Toolkit. Accessibility is handled by Cally (Clutter Accessibility Implementation Library).
Window management is handled by a modified version of Metacity called Mutter. Before the introduction of Metacity in GNOME 2.2, GNOME used Enlightenment and then Sawfish as its window manager. Metacity uses the GTK+ graphical widget toolkit to create its user interface components, enabling it to be themeable and blend in with other GTK+ applications. Mutter is a newer compositing window manager based on Metacity and Clutter. Note that the GNOME Shell fallback mode still uses Metacity and Gtk+, whereas the normal hardware accelerated mode uses Mutter. By the way, the GNOME Shell is actually implemented as a Mutter plugin. You can obtain copious amounts of debug information from Mutter using imports.gi.Meta.set_verbose(true) or you can control the volume of debug information using the add_verbose_topic method, e.g. to view only window state use Meta = imports.gi.Meta; Meta.add_verbose_topic(Meta.DebugTopic.WINDOW_STATE).
The GObject Introspection layer sits on top of Mutter and the Shell toolkit. One way to look at this layer is to consider it a glue layer between the Mutter and Shell Tookit libraries and JavaScript. GObject Introspection is used to automatically generate the GObject bindings for JavaScript (gjs) which is the language used to implement the GNOME Shell UI. The actual version of the JavaScript language available using gjs is 1.8.5 as this JavaScript engine is based on Mozilla’s Spidermonkey JavaScript engine.
The goal of GObject Introspection is to describe the set of APIs in a uniform, machine readable XML format called GIR. A typelib is a compiled version of a GIR which is designed to be fast, memory efficient and complete enough so that language bindings can be written on top of it without other sources of information. You can examine the contents of a specific typelib file using g-ir-generate. For example, here is what is stored in the Shell Toolkit typelib file for st_texture_cache_load_uri_sync which I use in Example 7 below.
#  g-ir-generate /usr/lib64/gnome-shell/St-1.0.typelib
....
      <method name="load_uri_sync" c:identifier="st_texture_cache_load_uri_sync" throws="1">
        <return-value transfer-ownership="none">
          <type name="Clutter.Actor"/>
        </return-value>
        <parameters>
          <parameter name="policy" transfer-ownership="none">
            <type name="TextureCachePolicy"/>
          </parameter>
          <parameter name="uri" transfer-ownership="none">
            <type name="utf8"/>
          </parameter>
          <parameter name="available_width" transfer-ownership="none">
            <type name="gint32"/>
          </parameter>
          <parameter name="available_height" transfer-ownership="none">
            <type name="gint32"/>
          </parameter>
        </parameters>
      </method>
....
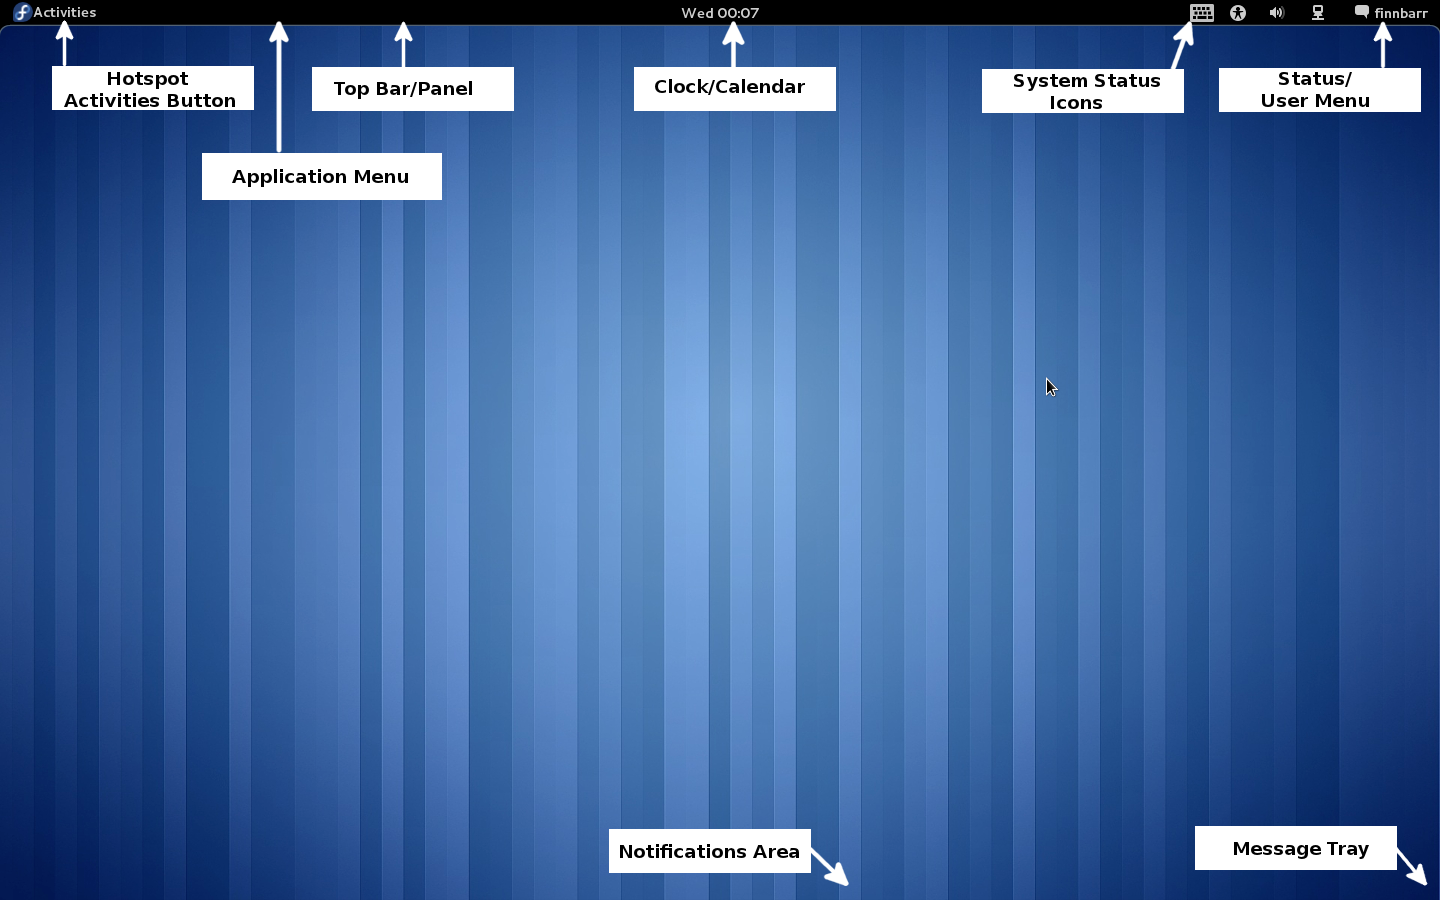
You also need to understand the various components that make up the GNOME Shell UI if you are going to be successful in customizing the GNOME Shell. Here are the various components of the screen displayed just after you successfully log in.
Here is a description of the various components:
- Top Bar (Also called Panel) – Horizontal bar at the top of the scrren. This is main access point to the shell. (../js/ui/panel.js)
- Activities button (Also called Hotspot) – Button and Hot Corner that brings up the Overview (see below). (../js/ui/panel.js)
- Application menu – Shows the name of the currently-focused application. You can click on it to get a menu of relevant actions. (../js/ui/panel.js)
- Clock – Also contains the Calendar (../js/ui/dateMenu.js)
- System Status Icons – Icons for accessibility options, Bluetooth, keyboard layout, etc. (../js/ui/status/*)
- Status Menu – Also contains the user menu. Lets you change your IM status, personal preferences, and exit the session. (../js/ui/statusMenu.js)
- Notifications Area – The part of the ephemeral horizontal bar at the bottom of screen where notifications are displayed. (../js/ui/notificationDaemon.js)
- Message tray – The part of the ephemeral horizontal bar at the bottom of screen where pending notifications and other messages display. (../js/ui/messageTray.js)
All the JavaScript code referenced above and in the next section is under /usr/share/gnome-shell.
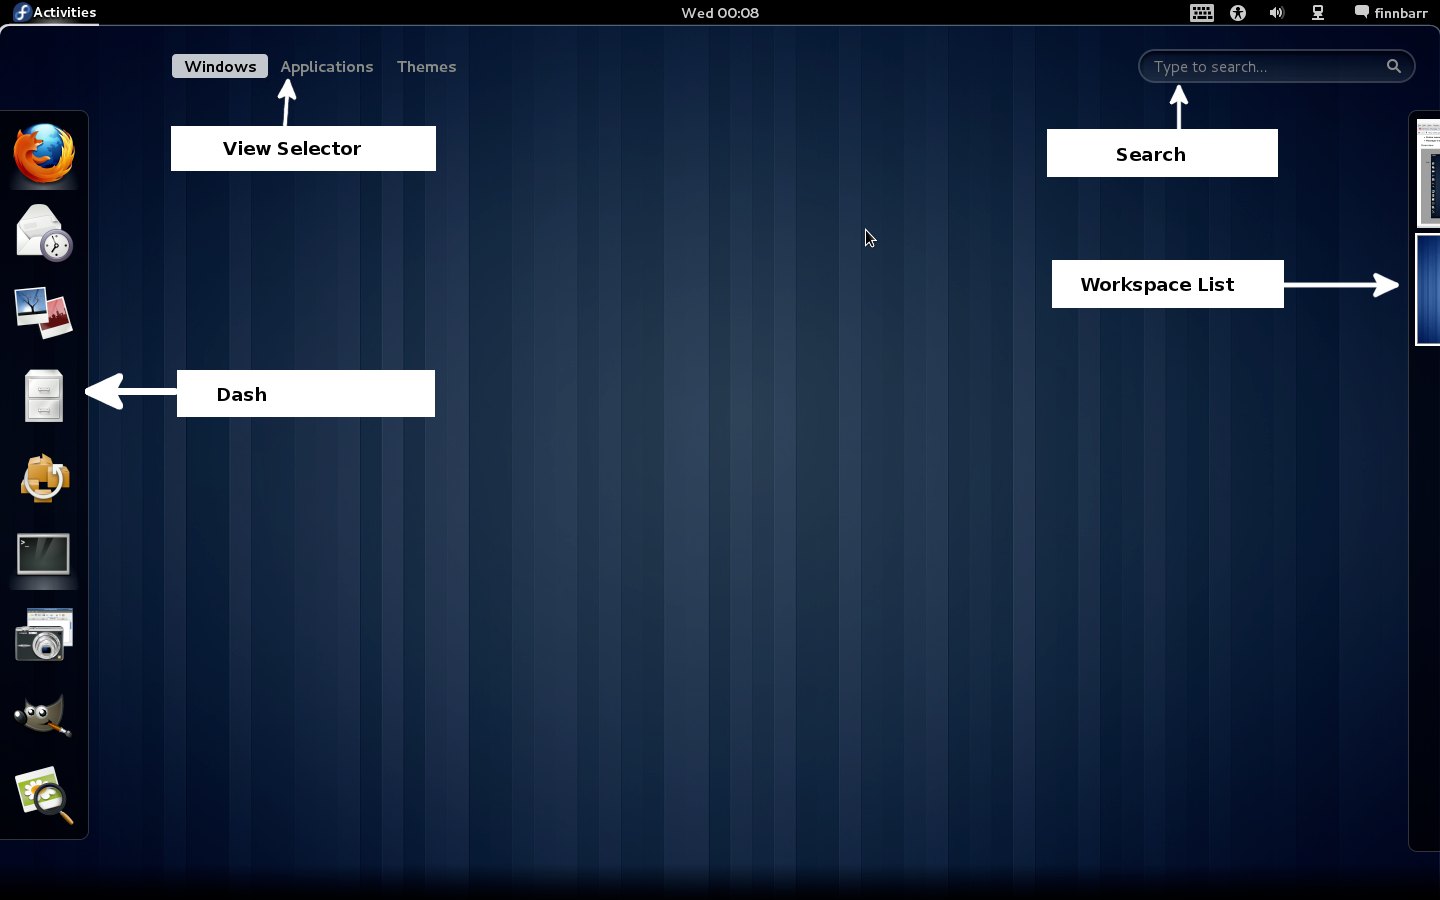
The Overview screen is what you see when you click on the Activities button. It is mainly implemented in ../js/ui/overview.js. It has the following UI components:
Here is a description of the various components in this particular screen:
- Dash – Vertical bar on the left, that shows your favourite applications. (../js/ui/dash.js)
- View Selector – Lets you pick between Windows and Applications. (../js/ui/viewSelector.js, ../js/ui/overview.js)
- Search Entry – When you enter a string, various things (application names, documents, etc.) get searched. (../js/ui/viewSelector.js for the entry, and ../js/ui/searchDisplay.js for the display of search results)
- Workspace List – Vertical bar on the right, with thumbnails for the active workspaces. (../js/ui/workspaceSwitcherPopup.js)
In the following examples, I demonstrate how to customize various components of the GNOME Shell UI using extensions or by directly modifying the source code as in Example 7 if an extension is not possible. I assume that you know JavaScript and the components that form a GNOME Shell extension.
Example 1:
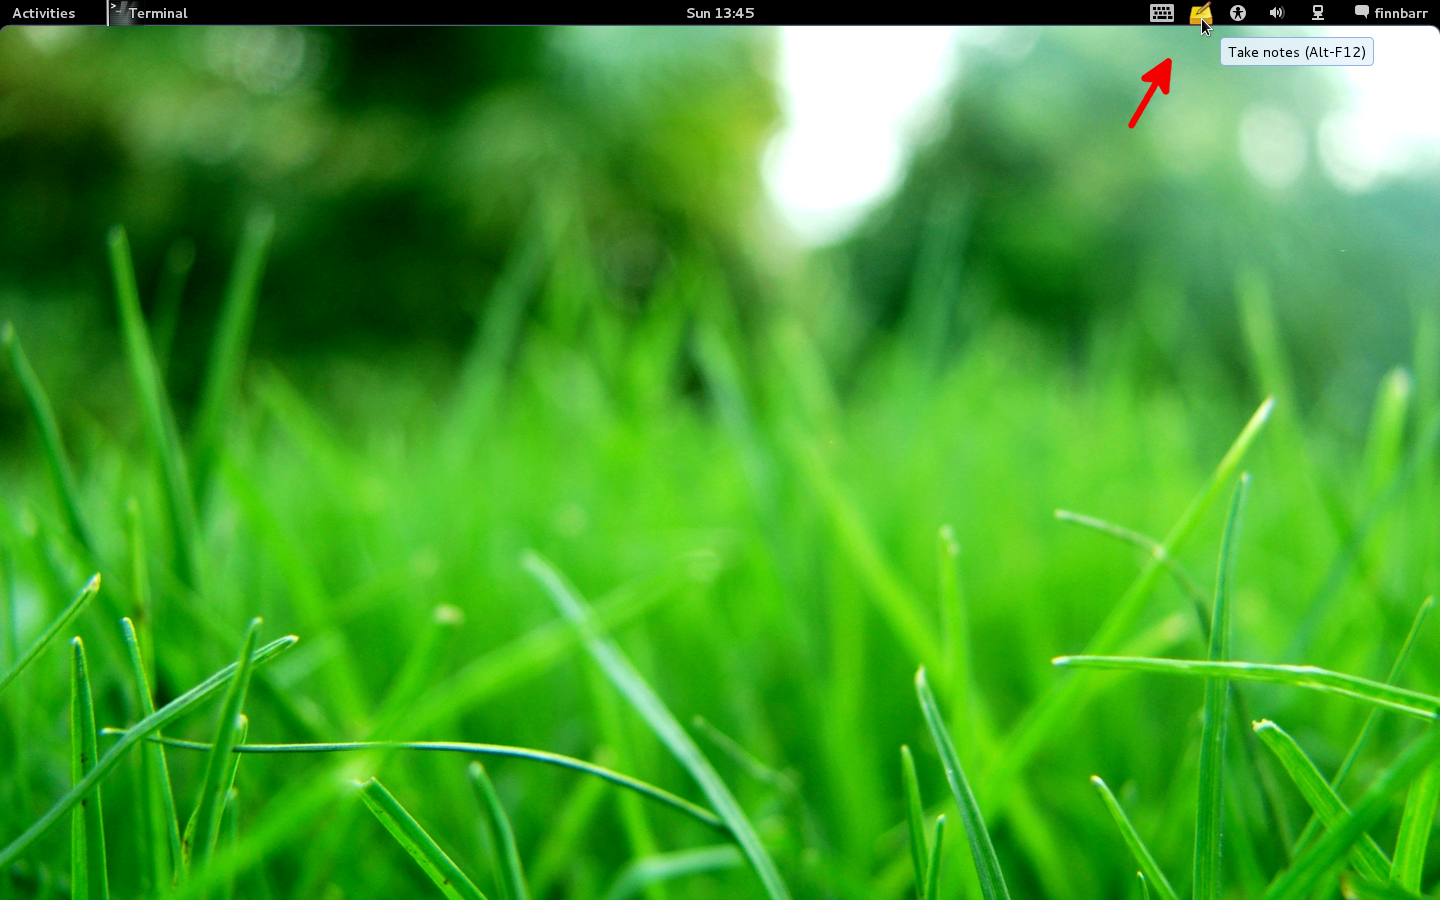
The GNOME Shell developers are pushing hard to eliminate the traditional notification area on the top bar of GNOME desktops. However for the moment, tray icons are still displayed on the Panel to the left of the System Status area.
For example gnote normally displays in the GNOME Shell message area as shown below:
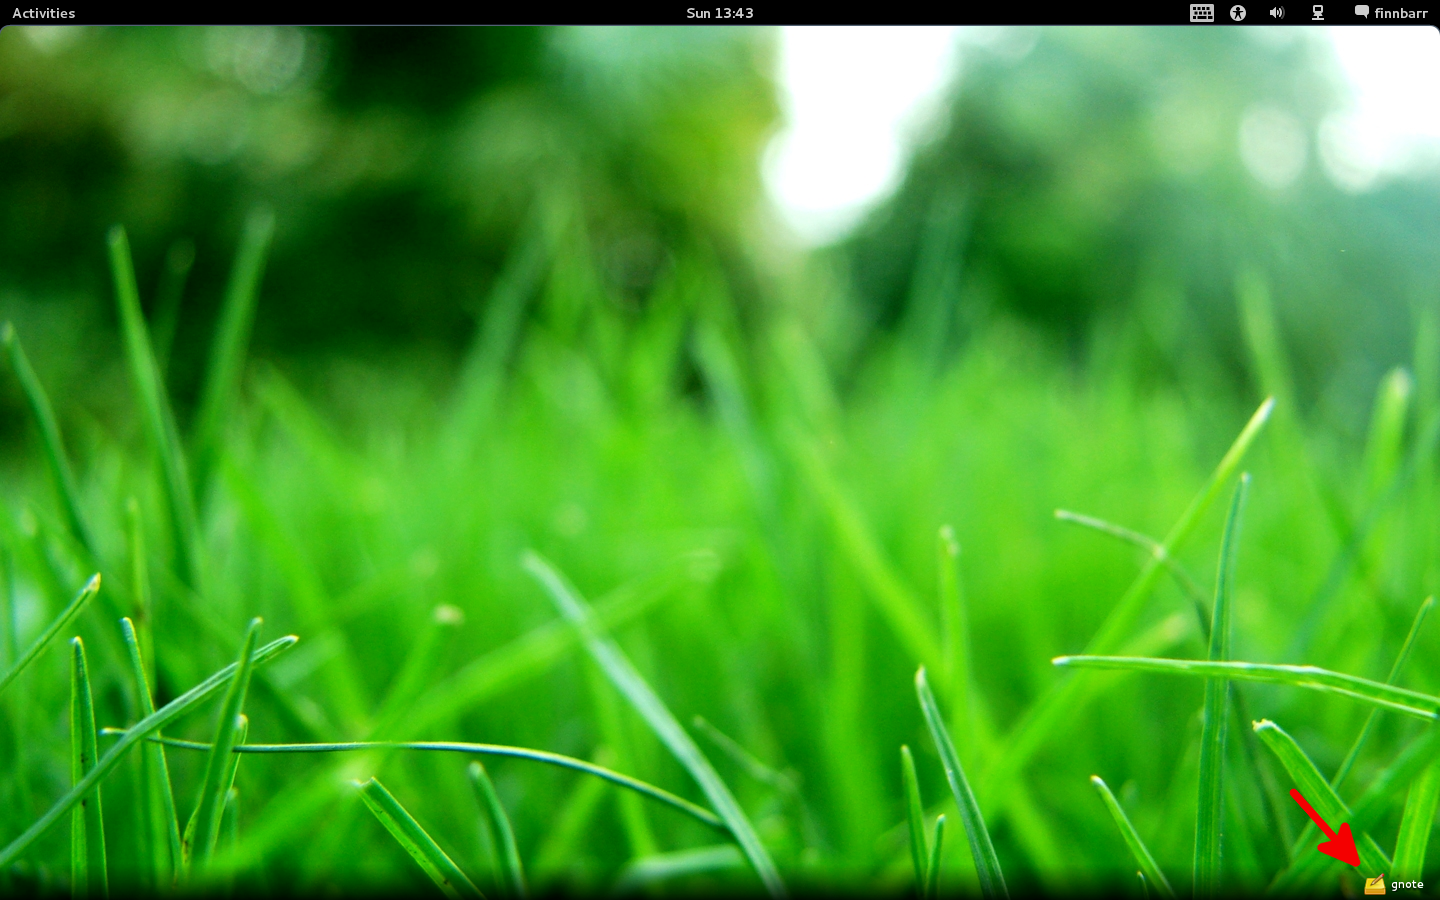
With this simple extension:
const Panel = imports.ui.panel;
const StatusIconDispatcher = imports.ui.statusIconDispatcher;

function main() {

    // add the notification(s) you want display on the top bar
    // - one per line. Use the english text string displayed when
    // hovering your mouse over the bottom right notification area

    StatusIconDispatcher.STANDARD_TRAY_ICON_IMPLEMENTATIONS['gnote'] = 'gnote';

}
you can get gnote to display on the Panel.
Note how you import a module using the imports keyword. If you want to import a specific API version of a module, you can do so by specifying the required version number, e.g.
const Gtk = imports.gi.versions.Gtk = '3.0';
Example 2:
There is an existing extension in the gnome-shell-extensions source code repository called alternative status menu which replaces the GNOME Shell status menu in its entirety just so that the Power Off, Suspend and Hibernate menu options can be displayed instead of just the Suspend menu option.
Instead of the brute force approach used by this extension, the code shown below simply locates the suspend menu option and replaces it with the three required menu options and the auxiliary support functions.
const St = imports.gi.St;
const Main = imports.ui.main;
const PopupMenu = imports.ui.popupMenu;
const Shell = imports.gi.Shell;
const Lang = imports.lang;
const Gettext = imports.gettext.domain('gnome-shell');
const _ = Gettext.gettext;


function updateSuspend(object, pspec, item) {
    item.actor.visible = object.get_can_suspend();
}

function updateHibernate(object, pspec, item) {
    item.actor.visible = object.get_can_hibernate();
}

function onSuspendActivate(item) {
    Main.overview.hide();

    this._screenSaverProxy.LockRemote(Lang.bind(this, function() {
        this._upClient.suspend_sync(null);
    }));
}

function onHibernateActivate(item) {
    Main.overview.hide();

    this._screenSaverProxy.LockRemote(Lang.bind(this, function() {
        this._upClient.hibernate_sync(null);
    }));
}

function changeUserMenu()
{
    let children = this.menu._getMenuItems();
    for (let i = 0; i < children.length; i++) {
         let item = children[i];
         if (item.label) {
              let _label = item.label.get_text();
              // global.log("menu label: " + _label);
              if (_label == _("Suspend"))
                   item.destroy();
         }
    }

    let item = new PopupMenu.PopupMenuItem(_("Suspend"));
    item.connect('activate', Lang.bind(this, onSuspendActivate));
    this._upClient.connect('notify::can-suspend', Lang.bind(this, updateSuspend, item));
    updateSuspend(this._upClient, null, item);
    this.menu.addMenuItem(item);

    item = new PopupMenu.PopupMenuItem(_("Hibernate"));
    item.connect('activate', Lang.bind(this, onHibernateActivate));
    this._upClient.connect('notify::can-hibernate', Lang.bind(this, updateHibernate, item));
    updateHibernate(this._upClient, null, item);
    this.menu.addMenuItem(item);

    item = new PopupMenu.PopupMenuItem(_("Power Off..."));
    item.connect('activate', Lang.bind(this, function() {
        this._session.ShutdownRemote();
    }));
    this.menu.addMenuItem(item);

}

function main(metadata) {

    // Post 3.0  let statusMenu = Main.panel._userMenu;
    let statusMenu = Main.panel._statusmenu;
    changeUserMenu.call(statusMenu);

}
There are different types of power hibernation but the above example just uses the default method. Some people might find it useful to have a sleep menu option also.
Note that I have commented out a line of code in the main function. The commented out line is what you should use in post 3.0 versions of the GNOME Shell. How you access Panel objects is changing. See GNOME Bugzilla 646915 for full details. Essentially, a number of Panel objects have been renamed and a _statusArea object now points to status area PanelButton objects. The idea is that you will be able to address each Panel object consistently as follows:
    Main.panel._activities
    Main.panel._appMenu
    Main.panel._dateMenu
    Main.panel._statusArea.a11y
    Main.panel._statusArea.volume
    Main.panel._userMenu
Example 3:
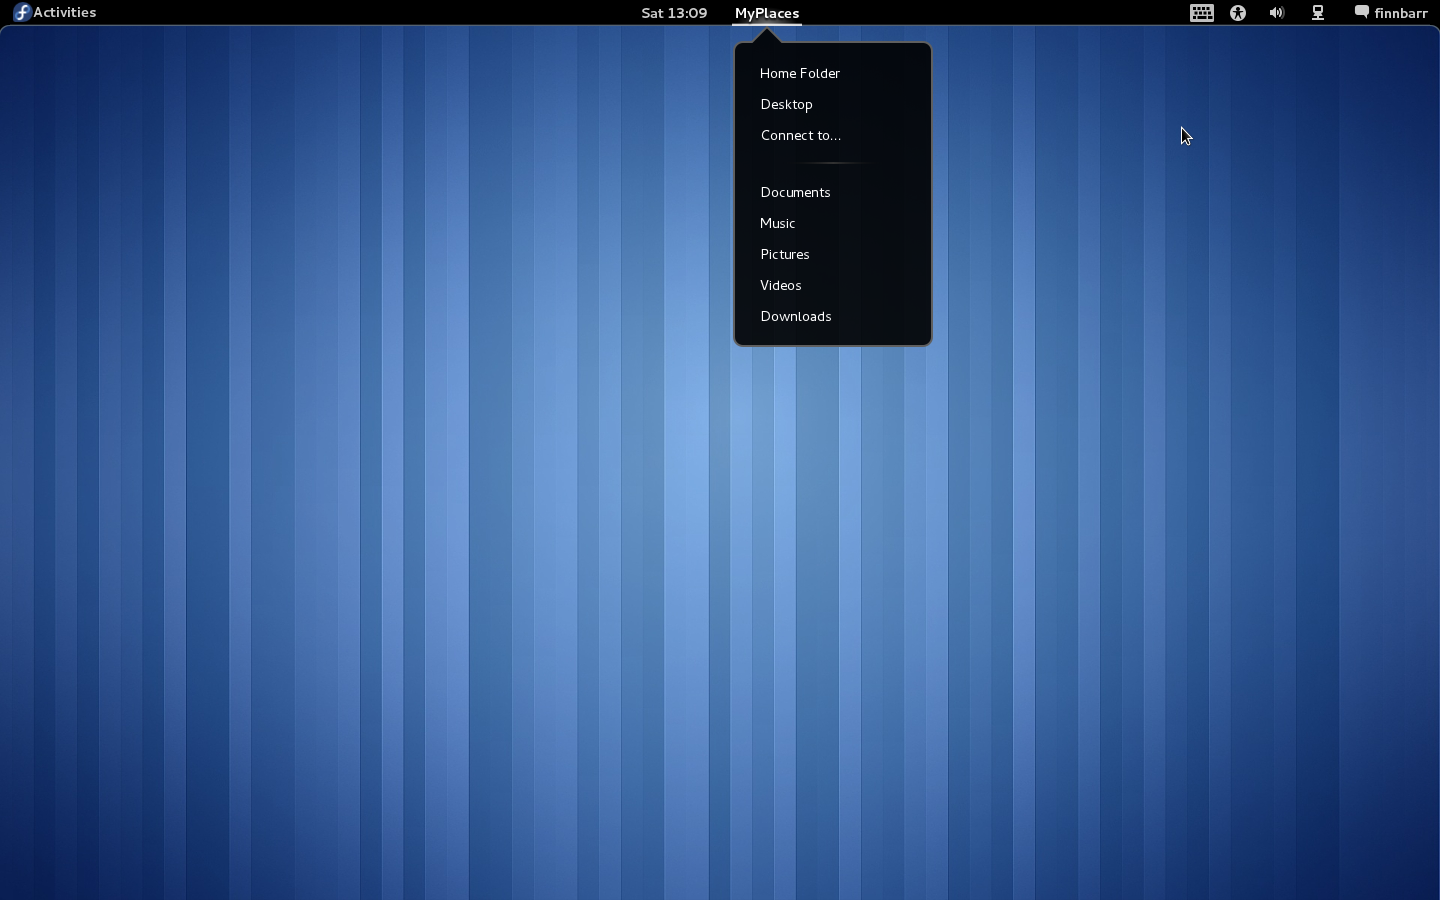
In this example. I show you how to add a menu to the middle of the Panel as shown below:
Here is the source code for the extension used to create that menu:
const St = imports.gi.St;
const Main = imports.ui.main;
const PopupMenu = imports.ui.popupMenu;
const PanelMenu = imports.ui.panelMenu;
const Gettext = imports.gettext;
const _ = Gettext.gettext;


function PlacesButton() {
    this._init();
}

PlacesButton.prototype = {
    __proto__: PanelMenu.Button.prototype,

    _init: function() {
        PanelMenu.Button.prototype._init.call(this, 0.0);

        this._label = new St.Label({ text: _("MyPlaces") });
        this.actor.set_child(this._label);
        Main.panel._centerBox.add(this.actor, { y_fill: true });

        let placeid;
        this.placeItems = [];

        this.defaultPlaces = Main.placesManager.getDefaultPlaces();
        this.bookmarks     = Main.placesManager.getBookmarks();
        this.mounts        = Main.placesManager.getMounts();

        // Display default places
        for ( placeid = 0; placeid < this.defaultPlaces.length; placeid++) {
            this.placeItems[placeid] = new PopupMenu.PopupMenuItem(_(this.defaultPlaces[placeid].name));
            this.placeItems[placeid].place = this.defaultPlaces[placeid];
            this.menu.addMenuItem(this.placeItems[placeid]);
            this.placeItems[placeid].connect('activate', function(actor,event) {
                actor.place.launch();
            });

        }

        this.menu.addMenuItem(new PopupMenu.PopupSeparatorMenuItem());
        // Display default bookmarks
        for ( let bookmarkid = 0; bookmarkid < this.bookmarks.length; bookmarkid++, placeid++) {
            this.placeItems[placeid] = new PopupMenu.PopupMenuItem(_(this.bookmarks[bookmarkid].name));
            this.placeItems[placeid].place = this.bookmarks[bookmarkid];
            this.menu.addMenuItem(this.placeItems[placeid]);
            this.placeItems[placeid].connect('activate', function(actor,event) {
                actor.place.launch();
            });
        }

        if (this.mounts.length > 0) {
            this.menu.addMenuItem(new PopupMenu.PopupSeparatorMenuItem());
        }

        // Display default mounts
        for ( let mountid = 0; mountid < this.mounts.length; placeid++, mountid++ ) {
            this.placeItems[placeid] = new PopupMenu.PopupMenuItem(_(this.mounts[mountid].name));
            this.placeItems[placeid].place = this.mounts[mountid];
            this.menu.addMenuItem(this.placeItems[placeid]);
            this.placeItems[placeid].connect('activate', function(actor,event) {
                actor.place.launch();
            });
        }

        Main.panel._centerBox.add(this.actor, { y_fill: true });
        Main.panel._menus.addMenu(this.menu);

    }

};

function main(extensionMeta) {

    let userExtensionLocalePath = extensionMeta.path + '/locale';
    Gettext.bindtextdomain("places_button", userExtensionLocalePath);
    Gettext.textdomain("places_button");

    new PlacesButton();
}
Notice how you can retrieve details of all places, bookmarks and mounts from Main.placesManager:
places = Main.placesManager.getDefaultPlaces();
bookmarks  = Main.placesManager.getBookmarks();
mounts  = Main.placesManager.getMounts();
Example 4:
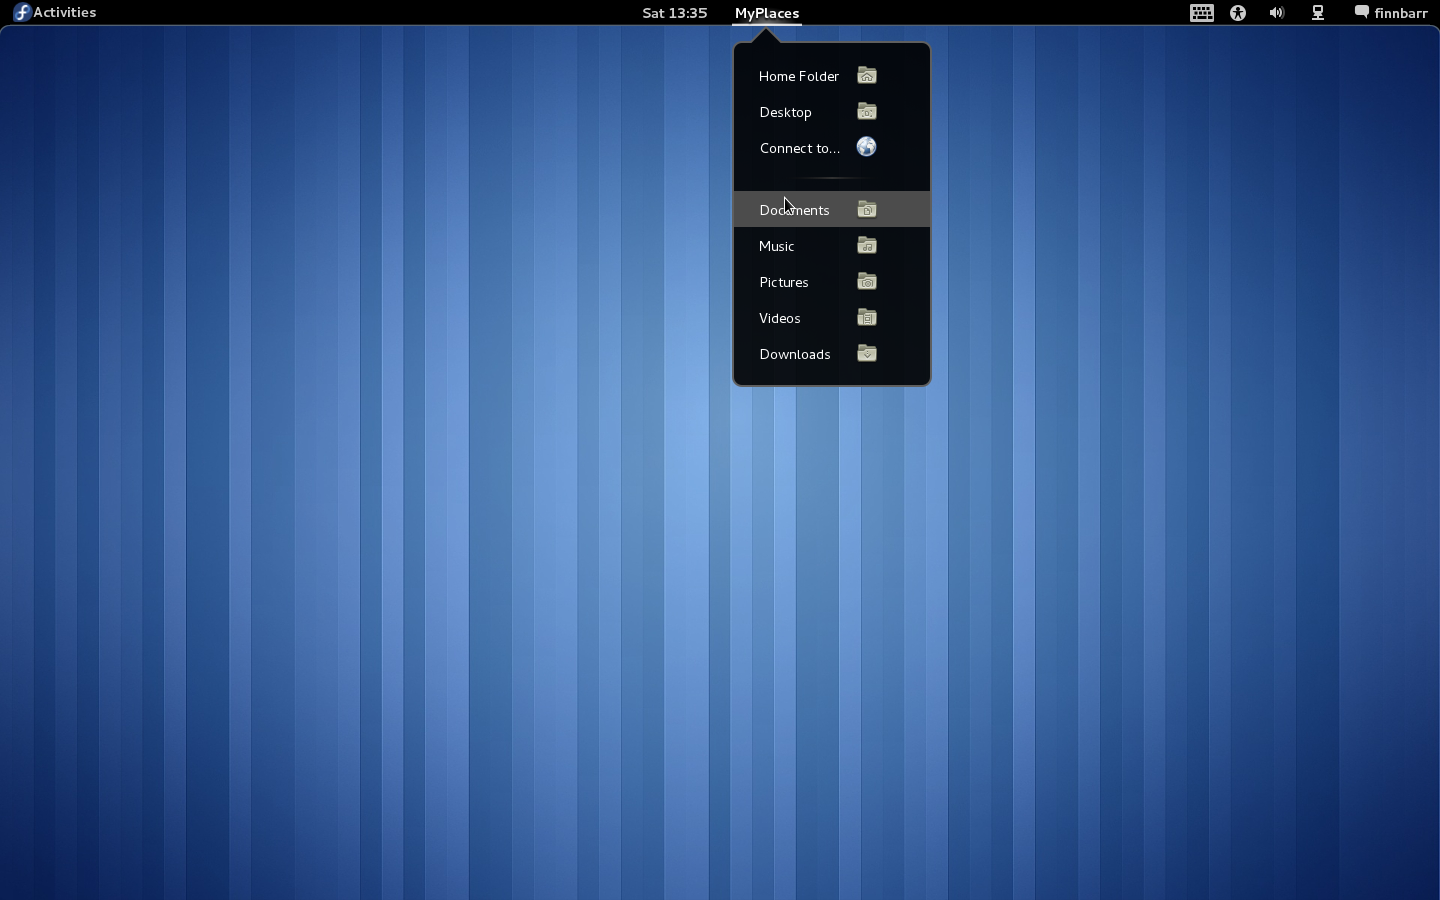
In this example, I show you how to extend the previous example to display icons on each menu option as shown below:
Here is the modified source code:
const St = imports.gi.St;
const Main = imports.ui.main;
const PopupMenu = imports.ui.popupMenu;
const PanelMenu = imports.ui.panelMenu;
const Gettext = imports.gettext;
const _ = Gettext.gettext;

const MYPLACES_ICON_SIZE = 22;


function PlacesButton() {
    this._init();
}

PlacesButton.prototype = {
    __proto__: PanelMenu.Button.prototype,

    _init: function() {
        PanelMenu.Button.prototype._init.call(this, 0.0);

        this._label = new St.Label({ text: _("MyPlaces") });
        this.actor.set_child(this._label);
        Main.panel._centerBox.add(this.actor, { y_fill: true });

        let placeid;
        this.placeItems = [];

        this.defaultPlaces = Main.placesManager.getDefaultPlaces();
        this.bookmarks     = Main.placesManager.getBookmarks();
        this.mounts        = Main.placesManager.getMounts();

        // Display default places
        for ( placeid = 0; placeid < this.defaultPlaces.length; placeid++) {
            this.placeItems[placeid] = new PopupMenu.PopupMenuItem(_(this.defaultPlaces[placeid].name));
            let icon = this.defaultPlaces[placeid].iconFactory(MYPLACES_ICON_SIZE);
            this.placeItems[placeid].addActor(icon, { align: St.Align.END});
            this.menu.addMenuItem(this.placeItems[placeid]);
            this.placeItems[placeid].connect('activate', function(actor,event) {
                actor.place.launch();
            });

        }

        this.menu.addMenuItem(new PopupMenu.PopupSeparatorMenuItem());

        this.menu.addMenuItem(new PopupMenu.PopupSeparatorMenuItem());

        // Display default bookmarks
        for ( let bookmarkid = 0; bookmarkid < this.bookmarks.length; bookmarkid++, placeid++) {
            this.placeItems[placeid] = new PopupMenu.PopupMenuItem(_(this.bookmarks[bookmarkid].name));
            let icon = this.bookmarks[bookmarkid].iconFactory(MYPLACES_ICON_SIZE);
            this.placeItems[placeid].addActor(icon, { align: St.Align.END});
            this.menu.addMenuItem(this.placeItems[placeid]);
            this.placeItems[placeid].connect('activate', function(actor,event) {
                actor.place.launch();
            });
        }

       if (this.mounts.length > 0) {
           this.menu.addMenuItem(new PopupMenu.PopupSeparatorMenuItem());
       }

        // Display default mounts
        for ( let mountid = 0; mountid < this.mounts.length; placeid++, mountid++ ) {
            this.placeItems[placeid] = new PopupMenu.PopupMenuItem(_(this.mounts[mountid].name));
            let icon = this.mounts[mountid].iconFactory(MYPLACES_ICON_SIZE);
            this.placeItems[placeid].addActor(icon, { align: St.Align.END});
            this.placeItems[placeid].place = this.mounts[mountid];
            this.menu.addMenuItem(this.placeItems[placeid]);
            this.placeItems[placeid].connect('activate', function(actor,event) {
                actor.place.launch();
            });
        }

        Main.panel._centerBox.add(this.actor, { y_fill: true });
        Main.panel._menus.addMenu(this.menu);

    }

};


function main(extensionMeta) {

    let userExtensionLocalePath = extensionMeta.path + '/locale';
    Gettext.bindtextdomain("places_button", userExtensionLocalePath);
    Gettext.textdomain("places_button");

    new PlacesButton();
}
The heavy lifting in creating icons is done by iconFactory which is a JavaScript callback that creates an icon texture given a size parameter. It is implemented in ../js/ui/placeDisplay.js
iconFactory: function(size) {
        let icon = this._mount.get_icon();
        return St.TextureCache.get_default().load_gicon(null, icon, size);
},
Example 5:
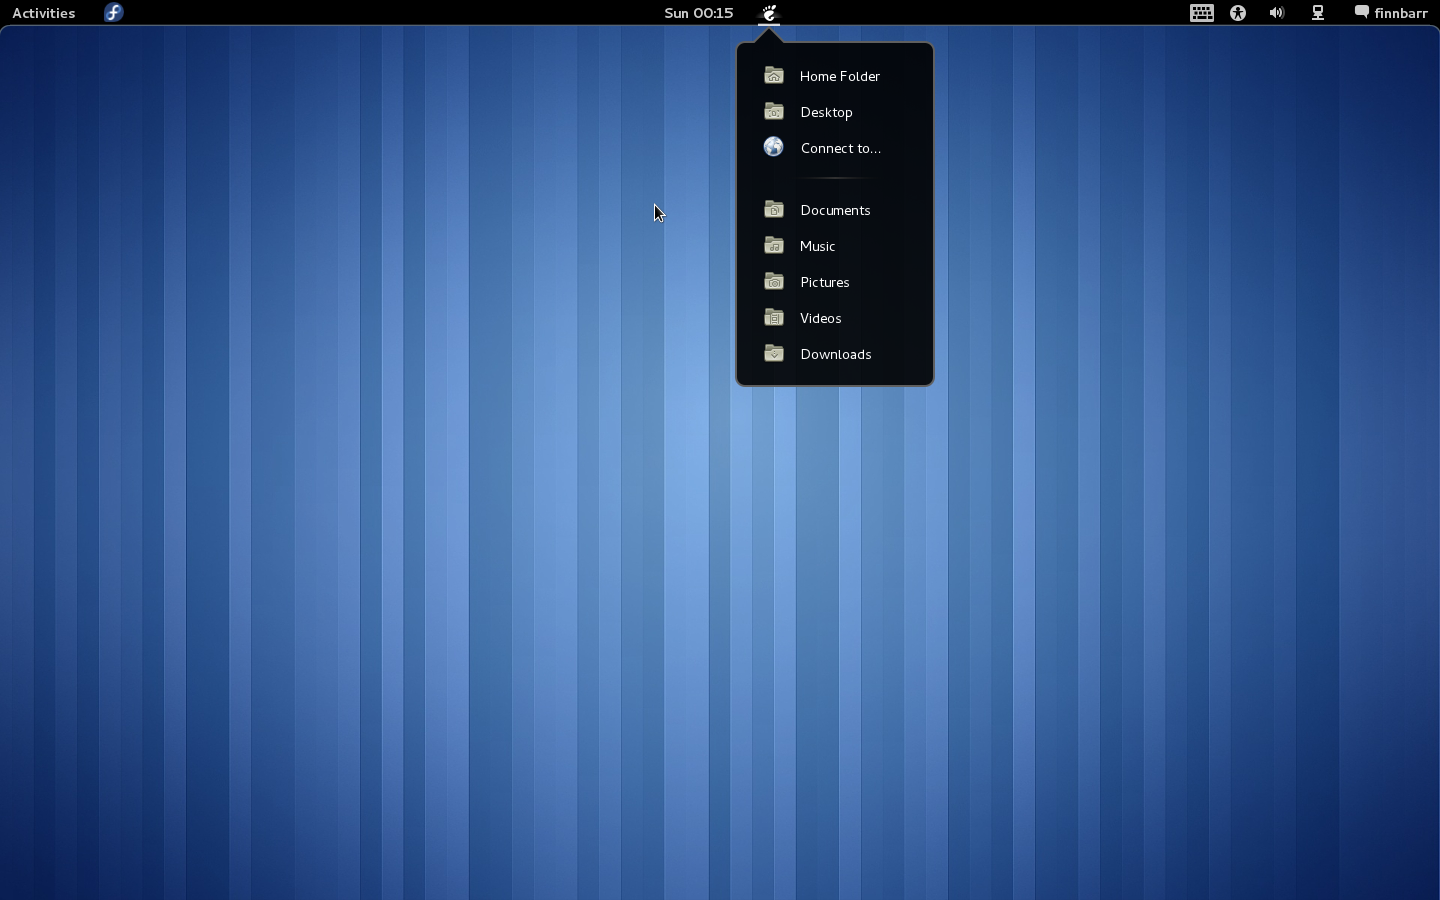
In this example, I show you how to modify the previous example to display icons followed by labels on each menu option as shown below:
Here is the relevant source code:
const St = imports.gi.St;
const Main = imports.ui.main;
const PopupMenu = imports.ui.popupMenu;
const PanelMenu = imports.ui.panelMenu;

const Gettext = imports.gettext;
const _ = Gettext.gettext;

const MYPLACES_ICON_SIZE = 22;


function MyPopupMenuItem() {
   this._init.apply(this, arguments);
}

MyPopupMenuItem.prototype = {
    __proto__: PopupMenu.PopupBaseMenuItem.prototype,

    _init: function(icon, text, params) {
          PopupMenu.PopupBaseMenuItem.prototype._init.call(this, params);

          this.addActor(icon);
          this.label = new St.Label({ text: text });
          this.addActor(this.label);
    }
};


function PlacesButton() {
    this._init();
}

function PlacesButton() {
    this._init();
}

PlacesButton.prototype = {
    __proto__: PanelMenu.Button.prototype,

    _init: function() {
        PanelMenu.Button.prototype._init.call(this, 0.0);

        this._icon = new St.Icon({ icon_name: 'start-here',
                                              icon_type: St.IconType.SYMBOLIC,
                                              style_class: 'system-status-icon' });
        this.actor.set_child(this._icon);
        Main.panel._centerBox.add(this.actor, { y_fill: true });

        let placeid;
        this.placeItems = [];

        this.defaultPlaces = Main.placesManager.getDefaultPlaces();
        this.bookmarks     = Main.placesManager.getBookmarks();
        this.mounts        = Main.placesManager.getMounts();

        // Display default places
        for ( placeid = 0; placeid < this.defaultPlaces.length; placeid++) {
            let icon = this.defaultPlaces[placeid].iconFactory(MYPLACES_ICON_SIZE);
            this.placeItems[placeid] = new MyPopupMenuItem(icon, _(this.defaultPlaces[placeid].name));

            this.menu.addMenuItem(this.placeItems[placeid]);
            this.placeItems[placeid].connect('activate', function(actor,event) {
                actor.place.launch();
            });

        }
        this.menu.addMenuItem(new PopupMenu.PopupSeparatorMenuItem());

        // Display default bookmarks
        for ( let bookmarkid = 0; bookmarkid < this.bookmarks.length; bookmarkid++, placeid++) {
            let icon = this.bookmarks[bookmarkid].iconFactory(MYPLACES_ICON_SIZE);
            this.placeItems[placeid] = new MyPopupMenuItem(icon, _(this.bookmarks[bookmarkid].name));

            this.menu.addMenuItem(this.placeItems[placeid]);
            this.placeItems[placeid].connect('activate', function(actor,event) {
                actor.place.launch();
            });
        }

       if (this.mounts.length > 0) {
           this.menu.addMenuItem(new PopupMenu.PopupSeparatorMenuItem());
       }

        // Display default mounts
        for ( let mountid = 0; mountid < this.mounts.length; placeid++, mountid++ ) {
            let icon = this.mounts[mountid].iconFactory(MYPLACES_ICON_SIZE);
            this.placeItems[placeid] = new MyPopupMenuItem(icon, _(this.mounts[mountid].name) );
            this.placeItems[placeid].place = this.mounts[mountid];

            this.menu.addMenuItem(this.placeItems[placeid]);
            this.placeItems[placeid].connect('activate', function(actor,event) {
                actor.place.launch();
            });
        }

        Main.panel._centerBox.add(this.actor, { y_fill: true });
        Main.panel._menus.addMenu(this.menu);

    }

};

function main(extensionMeta) {

    let userExtensionLocalePath = extensionMeta.path + '/locale';
    Gettext.bindtextdomain("places_button", userExtensionLocalePath);
    Gettext.textdomain("places_button");

    new PlacesButton();
}
I had to implement my own version of PopupMenuItem called MyPopupMenuItem in order to display an icon in front on the menuitem label. This is basically just a wrapper around PopupBaseMenuItem.
Example 6:
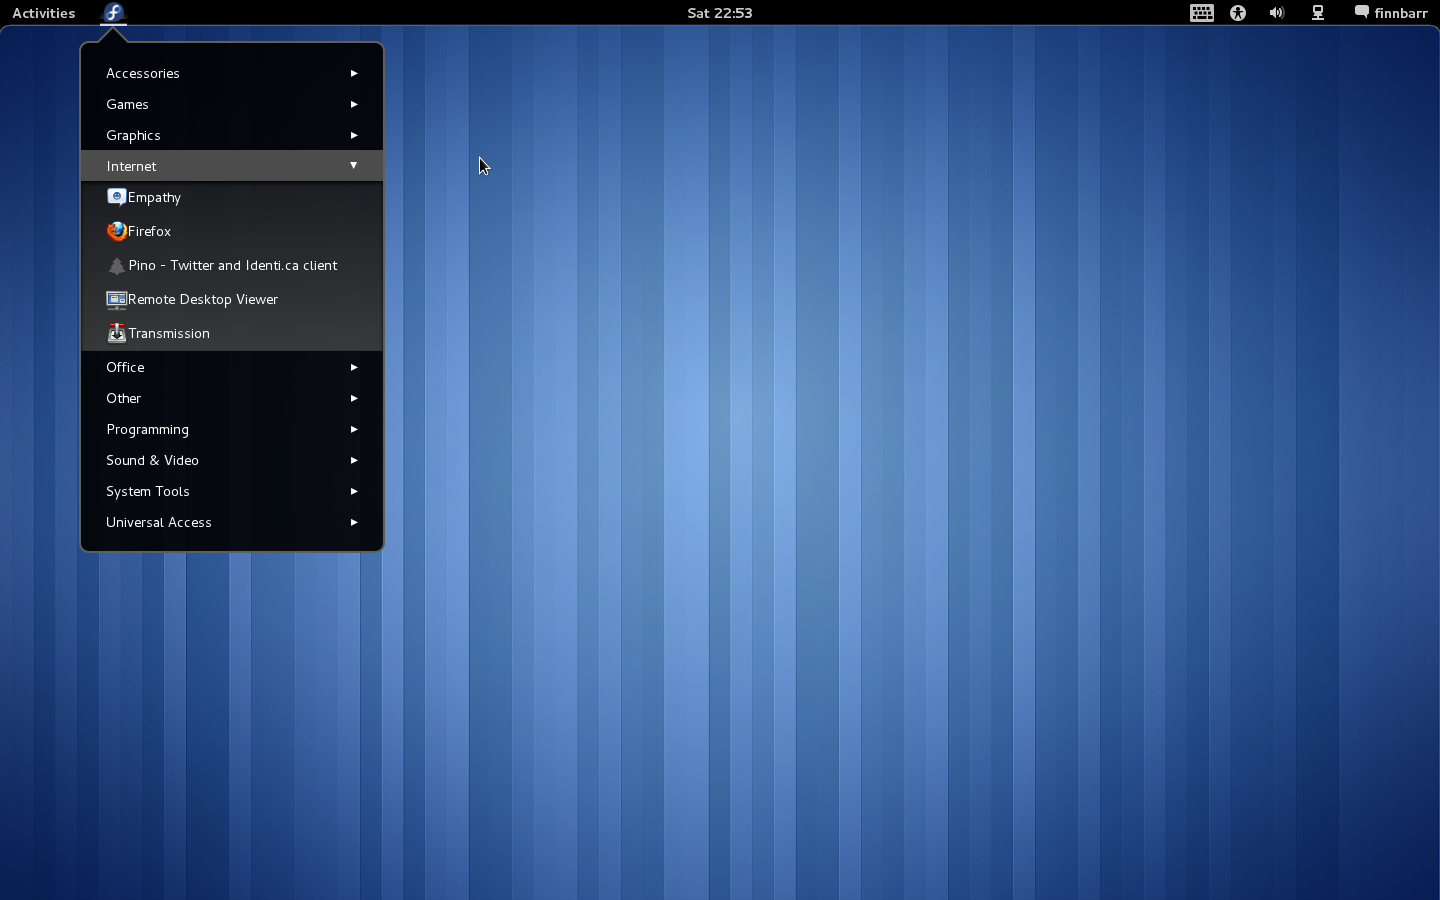
In this example, I show you how to add an Applications menu next to the Activities button.
Here is the source code for extension.js:
const St = imports.gi.St;
const Main = imports.ui.main;
const PopupMenu = imports.ui.popupMenu;
const PanelMenu = imports.ui.panelMenu;
const Shell = imports.gi.Shell;
const Lang = imports.lang;

const Gettext = imports.gettext;
const _ = Gettext.gettext;

const APPMENU_ICON_SIZE = 22;


function MyPopupMenuItem() {
   this._init.apply(this, arguments);
}

MyPopupMenuItem.prototype = {
    __proto__: PopupMenu.PopupBaseMenuItem.prototype,

    _init: function(icon, text, menu_icon_first, params) {
        PopupMenu.PopupBaseMenuItem.prototype._init.call(this, params);

        this.label = new St.Label({ text: text });

        if (menu_icon_first) {
            this.box = new St.BoxLayout({ style_class: 'applications-menu-box'});
            this.box.add(icon);
            this.box.add(this.label);
            this.addActor(this.box);
        } else {
            this.addActor(this.label);
            this.addActor(icon);
        }
    }

};


function ApplicationsButton() {
   this._init.apply(this, arguments);
}

ApplicationsButton.prototype = {
    __proto__: PanelMenu.Button.prototype,

    _init: function(mode) {
        PanelMenu.Button.prototype._init.call(this, 0.0);

        this._icon = new St.Icon({ icon_name: 'fedora-logo-icon',
                                   icon_type: St.IconType.FULLCOLOR,
                                   icon_size: Main.panel.button.height });
        this.actor.set_child(this._icon);

        this._appSys = Shell.AppSystem.get_default();
        this._categories = this._appSys.get_sections();
        this._menuIconFirst = mode;

        this._display();

        this._appSys.connect('installed-changed', Lang.bind(this, function() {
            Main.queueDeferredWork(this._reDisplay);
        }));

        // add immediately after hotspot
        Main.panel._leftBox.insert_actor(this.actor, 1);
        Main.panel._menus.addMenu(this.menu);
    },

   _display: function() {
        this.appItems = [];

        for (let id = 0; id < this._categories.length; id++) {
            this.appItems[this._categories[id]] = new PopupMenu.PopupSubMenuMenuItem(this._categories[id]);
            this.menu.addMenuItem(this.appItems[this._categories[id]]);
        }

        let appInfos = this._appSys.get_flattened_apps().filter(function(app) {
            return !app.get_is_nodisplay();
        });


        for (let appid = appInfos.length-1; appid >= 0; appid--) {
            let appInfo = appInfos[appid];
            let sec = appInfo.get_section();
            if (sec != null) {
                let icon = appInfo.create_icon_texture(APPMENU_ICON_SIZE);
                let appName = new MyPopupMenuItem(icon, appInfo.get_name(), this._menuIconFirst);
                // let appName = new PopupMenu.PopupMenuItem(appInfo.get_name());
                appName._appInfo = appInfo;

                this.appItems[appInfo.get_section()].menu.addMenuItem(appName);
                appName.connect('activate', function(actor,event) {
                    let id = actor._appInfo.get_id();
                    Shell.AppSystem.get_default().get_app(id).activate(-1);
                });
           }
       }

    },

    _redisplay: function() {
        for (let id = 0; id < this._categories.length; id++) {
            this.appItems[this._categories[id]].menu.destroy();
        }
        this._display();
    }
};


function main(extensionMeta) {

    let userExtensionLocalePath = extensionMeta.path + '/locale';
    Gettext.bindtextdomain("applications_button", userExtensionLocalePath);
    Gettext.textdomain("applications_button");

    new ApplicationsButton(false);
}
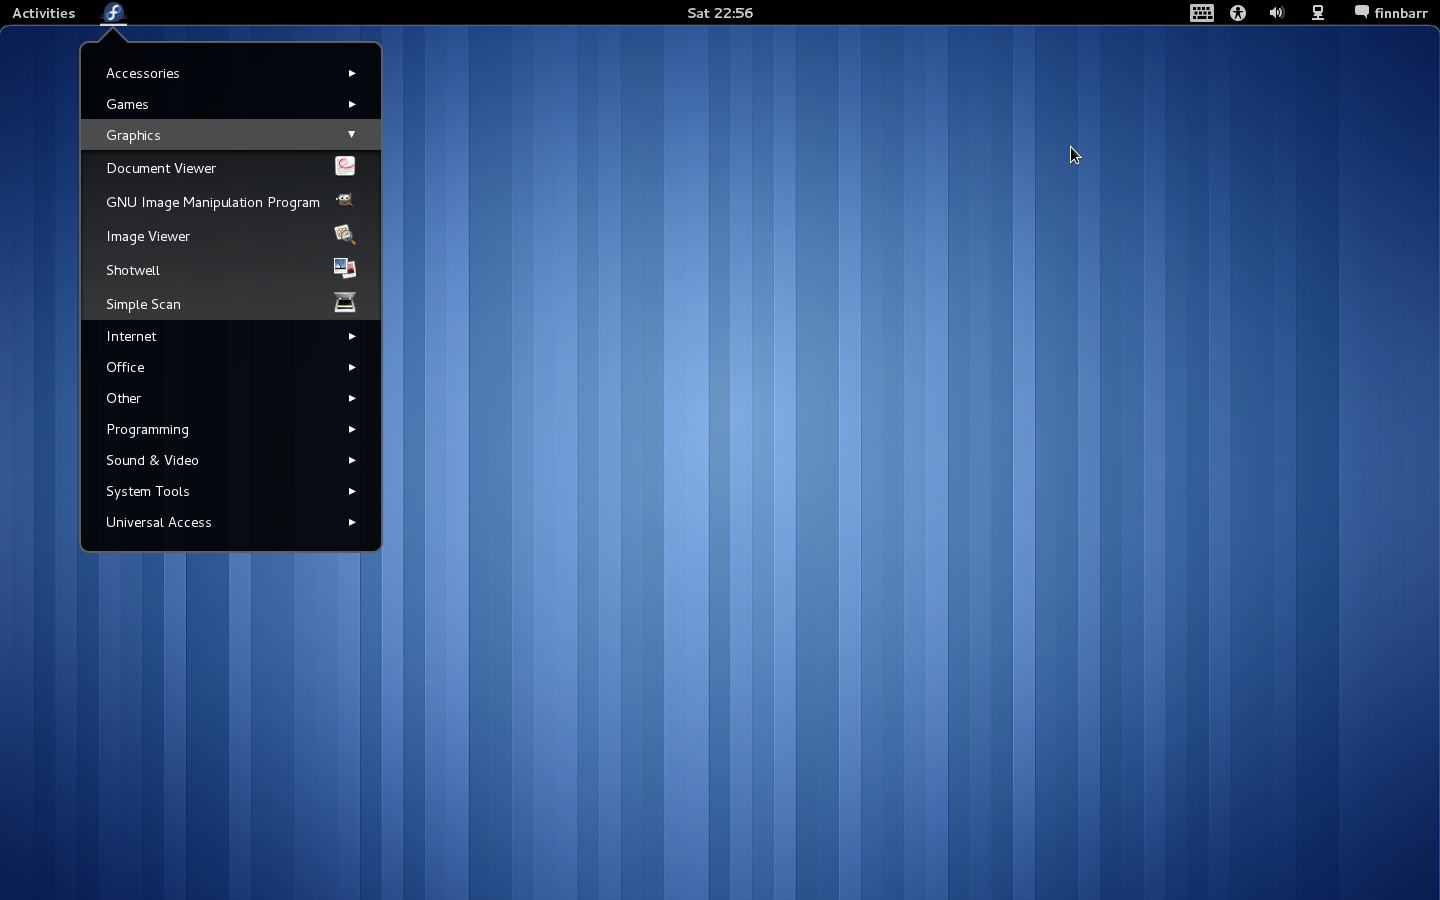
Again I implemented my own version of PopupMenuItem called MyPopupMenuItem in order to handle displaying an icon in front on the menuitem label or visa versa as shown below. If false is passed to ApplicationsButton when creating the new object, menu options are displayed label followed by icon, otherwise they are displayed icon followed by label.
Example 7:
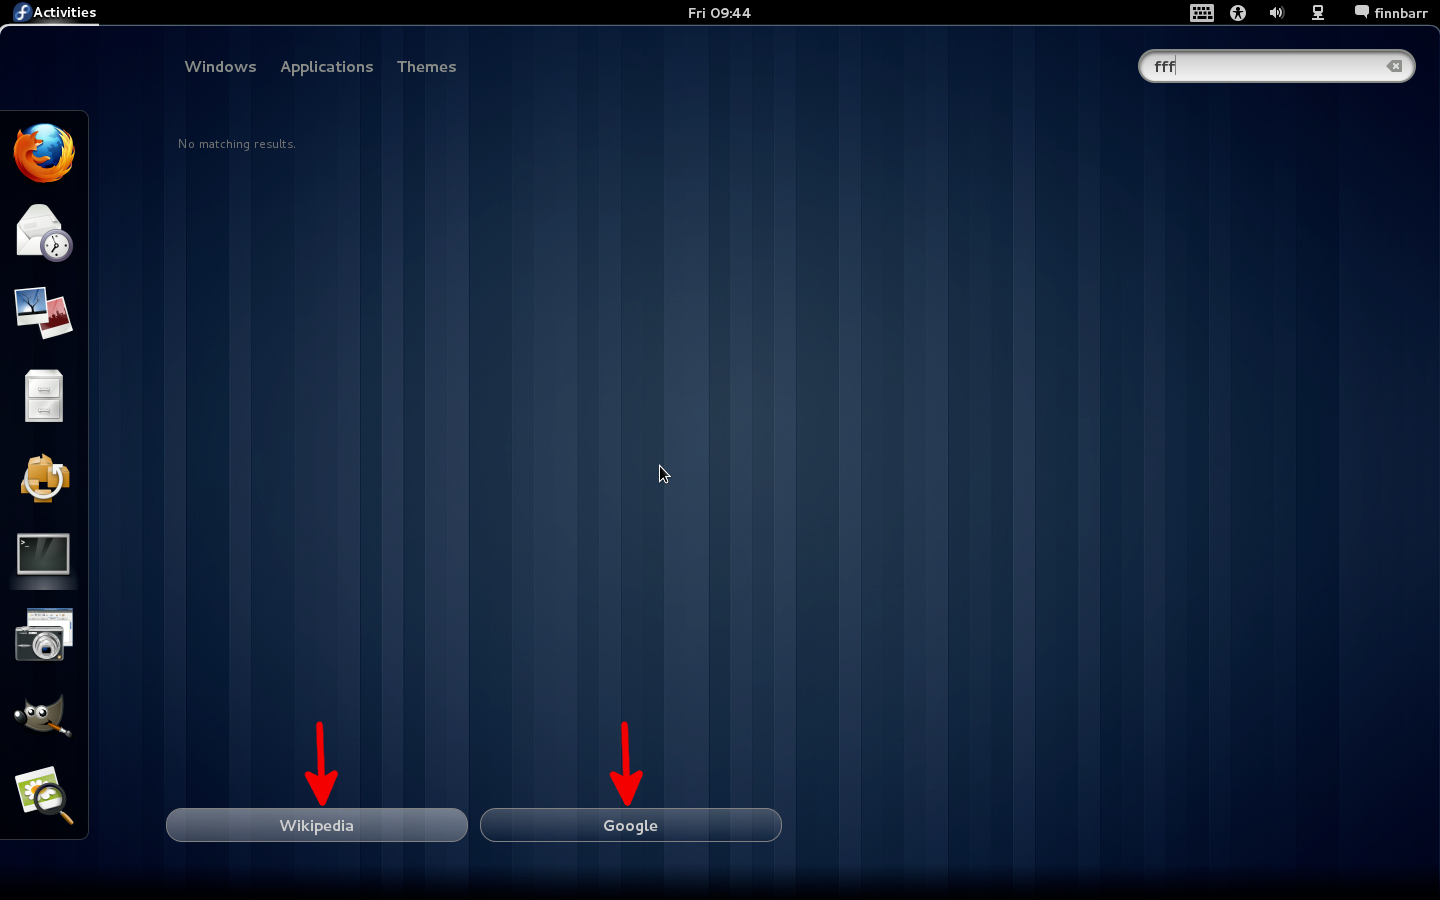
Not all components of the GNOME Shell can be easily modified or customized. For example, suppose I would like to display a search provider’s logo as an icon on their search provider button. The icon is already available as a base64 string in a search provider’s OpenSearch xml file but is not currently used by the GNOME Shell.
Here is how the search provider buttons look like at present:
Looking at the current source code for the GNOME Shell, we can see that in search.js the icon string is read by parse_search_provider and stored in the _providers array.
   _addProvider: function(fileName) {
        let path = global.datadir + '/search_providers/' + fileName;
        let source = Shell.get_file_contents_utf8_sync(path);
        let [success, name, url, langs, icon_uri] = global.parse_search_provider(source);

        let provider ={ name: name,
                        url: url,
                        id: this._providers.length,
                        icon_uri: icon_uri,
                        langs: langs };
        if (this._checkSupportedProviderLanguage(provider)) {
            this._providers.push(provider);
            this.emit('changed');
        }
    },
However it is not passed to where the search provider button is created in searchDisplay.js due to a limitation in the following piece of code in search.js:
    getProviders: function() {
        let res = [];
        for (let i = 0; i < this._providers.length; i++)
            res.push({ id: i, name: this._providers[i].name });
        return res;
    },
This needs to be modified to include the icon_uri base64 string, i.e.
    getProviders: function() {
        let res = [];
        for (let i = 0; i < this._providers.length; i++)
           res.push({ id: i, name: this._providers[i].name, icon_uri: this._providers[i].icon_uri });
        return res;
    },
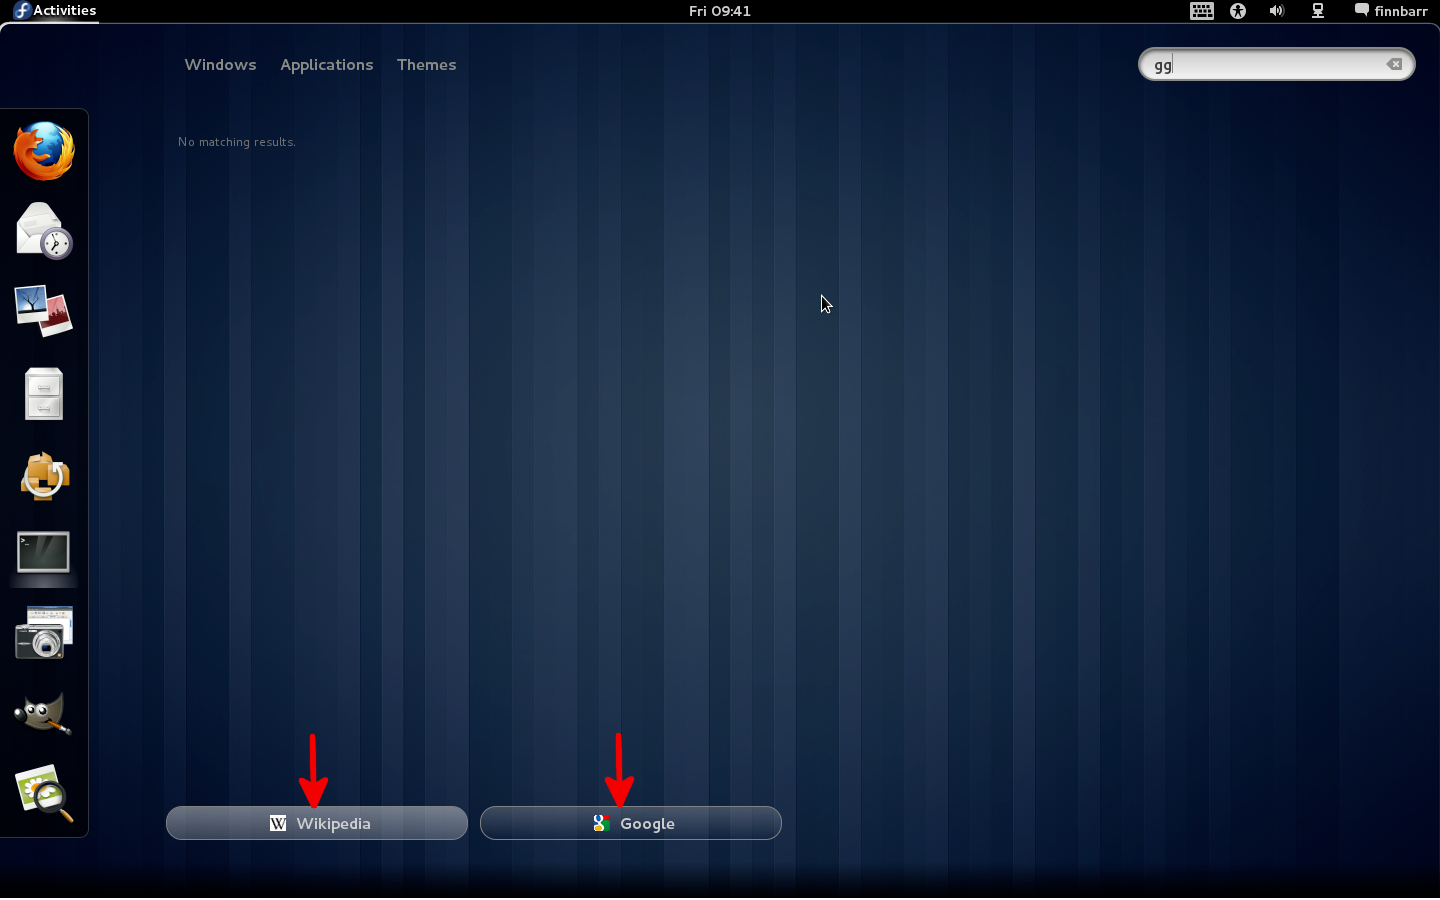
The next problem to overcome is how to decode the icon_uri base64 string and convert it into an actor.to displaying a search provider’s icon on their button. To do this you need to modify _createOpenSearchProviderButton in searchDisplay.js to display the icon as well as the name of the search provider.
Here is the original code
    _createOpenSearchProviderButton: function(provider) {
        let button = new St.Button({ style_class: 'dash-search-button',
                                     reactive: true,
                                     x_fill: true,
                                     y_align: St.Align.MIDDLE });
        let bin = new St.Bin({ x_fill: false,
                               x_align:St.Align.MIDDLE });
        button.connect('clicked', Lang.bind(this, function() {
            this._openSearchSystem.activateResult(provider.id);
        }));
        let title = new St.Label({ text: provider.name,
                                   style_class: 'dash-search-button-label' });

        bin.set_child(title);
        button.set_child(bin);
        provider.actor = button;

        this._searchProvidersBox.add(button);
    },
and here is the modified code which displays the search providers icon as well as their name.
    _createOpenSearchProviderButton: function(provider) {
        let button = new St.Button({ style_class: 'dash-search-button',
                                     reactive: true,
                                     x_fill: true,
                                     y_align: St.Align.MIDDLE });
        button.connect('clicked', Lang.bind(this, function() {
            this._openSearchSystem.activateResult(provider.id);
        }));
        let title = new St.Label({ text: provider.name,
                                   style_class: 'dash-search-button-label' });

        let textureCache = St.TextureCache.get_default();
        let searchIcon = textureCache.load_uri_sync(ST_TEXTURE_CACHE_POLICY_FOREVER,
                                                    provider.icon_uri, -1, -1);

        let iconBin = new St.Bin({ style_class: 'dash-search-button-icon',
                                   child: searchIcon });

        let box = new St.BoxLayout();
        box.add(iconBin, {expand: true, x_fill: false, x_align: St.Align.END });
        box.add(title, {expand: true, x_fill: false, x_align: St.Align.START });

        button.set_child(box);
        provider.actor = button;

        this._searchProvidersBox.add(button);
    },
With this modified code, here is how the search provider buttons now look like:
A GNOME Shell extension could probably be written to monkey patch the modified versions of the two functions into the GNOME Shell. It is something I will try to do when I get some free time.
Well, this post is getting too big and so it is time to conclude it. But before I do, I want to mention something about the GNOME Shell that has been on my mind recently as I experiment with its internals. For some reason the GNOME developers seem to think that the GNOME Shell should be an integral part of the OS and that is obvious in some of the design decisions. Recently Colin Walters stated that
Where we want to get to is that there are really just three things:
* Apps
* Extensions
* The OS
This is just plain wrong as far as I am concerned. A user should always have a choice of desktop managers and shells. Sounds like the vision of the GNOME developers, at least as articulated by Colin Walters in his post, is that the OS and the GNOME Shell should be one and the same as in Microsoft Windows. If this is the goal, then I fear that many existing users will abandon the GNOME desktop.
Sometimes I get the impression that the GNOME Shell was designed and put together by a group of arrogant young software engineers who were more interested in adhering to the tenants of so-called usability and design theory studies than in what their end users really needed in a modern graphical shell. Frankly, I fully agree with what Bruce Byfield recently wrote in Datamation about usability studies hurting the free desktop.
Fortunately, the decision to use JavaScript for the GNOME Shell UI may prove to be the salvation of the GNOME Shell as it allows ordinary users to quickly experiment with modifying parts of the UI. From what I see on the Internet, there are quite a few people experimenting with customizing the GNOME Shell either by directly modifying the source code or by developing extensions. While GNOME developers such as Lennart Poettering are advocating stricter vertical integration of the platform, I think that the decision to use JavaScript will be key to enabling users of GNOME Shell to easily bypass the diktats of the anointed few.
Don’t get me wrong – I like and use the GNOME Shell and really do not want to go back to GNOME 2 or another desktop manager, but I am often frustrated by it’s design constraints which get in the way of me doing what I want to do quickly and efficiently. Worse, when you look under the hood of the GNOME Shell, you quickly become aware of serious shortcomings in much of the underlying codebase. For example, why is the GNOME shell dependant on two distinct JavaScript engines, i.e. gjs and seed (webkit)? Pick one of these two JavaScript engines and remove the dependencies on the other. And why am I forced to use Evolution for calendaring? What happened to choice?
Adieu, and keep experimenting!
P.S. All of the extensions in this post will be downloadable from here.


Hi,
I tried to modify the ‘autohidetopbar’ extension, because I only want to see the top panel in the Overview screen. I think I only have to edit the lines ‘Main.panel.actor.connect(‘leave-event’, Lang.bind(Main.panel, Main.panel._hidePanel));’ and ‘Main.panel.actor.connect(‘enter-event’, Lang.bind(Main.panel, Main.panel._showPanel));’. The problem is that I don’t know where to connect functions to.
I tried it with things like ‘Main.overview.connect(“show”, Lang.bind(Main.panel, Main.panel._showPanel));’, but that didn’t work.
How can I find out where I can connect those callbacks to?
all I can say : THANKS !
Hi
Thanks for great examples,
just a question, How can i write unicode characters on the top panel?
Thanks in advance!!
Should be the same as you would do to write a UTF-8 string to the top panel. I have not tried it but if you provide an example of what you are trying to do, I will try and assist you.
Hi,
nice tutorials. I have a question too:
Do you know how to get subfolders or files of a folder (e.g. home). I don’t find anything in lg and dunno where to find an API or something like that.
As programmer it’s easy to follow your examples, but hard to write something new, cause there is no docs or is there?
Thanks for good examples!
Where may I read documentation for used objects in this examples?
const St = imports.gi.St;
const Main = imports.ui.main;
const PopupMenu = imports.ui.popupMenu;
const PanelMenu = imports.ui.panelMenu;
const Gettext = imports.gettext;
Thanks for this: I was able to modify it to add my favourite apps’ systray icons to the panel.
Some comments:
1. You declare const Panel, but don’t use it; why?
2. The standard format for extensions now seems to be to have init, enable and disable methods. I tried renaming your main method to enable, providing a blank init method, but it doesn’t work; also, I tried to add a disable method which set the various elements to null instead of a string, but that didn’t work either. Any hints on making this extension better-behaved (so it can e.g. be turned on and off in gnome-tweak-tool?).
3. The comment says “Use the english text string displayed when hovering your mouse over the bottom right notification area”, but this seems to be wrong: for example, for caffeine (the screensaver controller), the text string is caffeine-cup-empty (even when it’s full!) but the string to use is “caffeine”. Similarly, the string displayed for GMPC is “GNOME Music Player” or something, but the string to use is “gmpc”. Hence, the correct string would seem to be the application name; at least, that’s more likely to work.
4. Could you please put a mailto: link on your contact page? Using web forms is a pain as I don’t get to keep a record of what I wrote. (The way to avoid spam is to use a spam filter, not to hide your email address!)
I tried sending this as an email, but I got an error “Illegal characters in POST. Possible email injection attempt.”
First and foremost your Gnome 3 extensions are brilliant and much appreciated! Thanks for the tweaks and tutorial.
I switched to Gnome 3 on Ubuntu 11.10 and hiding the top bar is the feature I desire Most! I installed your “autohidetopbar” extension and it didn’t work at first. Using looking glass I got errors for missing init, enable, and disable methods (is that new on the Gnome 3 moving target, or just an Ubuntu distro issue…). “As a test” I modified the extension to add empty “enable” and “disable” methods, then created “init” to call “main”. I also updated the shell version in .json to 3.2.0.
That made the Top bar hide on double click, but then I couldn’t get it to reveal again. So I was curious, do you have a version of the autohidetopbar extension that addresses the issue I’m encountering?
Thanks again!
I’m sure you’re sick of requests for this by now, but could you please update the autohide top bar extension for Gnome 3.2 in Ubuntu 11.10? I can confirm that updating the version in .json doesn’t help. I even tried moving the autohide extension to /usr/share/gnome-shell/extensions with all the other gnome-shell extensions. It shows up in the gnome-tweak shell extension section, but it has an exclamation mark next to it and the on/off switch is grayed out.
Love your site and all your hard work on Gnome-shell, otherwise. You single handedly made Gnome Shell usable for me.
As above, another vote for some work to the autohidetopbar in Ubuntu. Thanks for explaining all JS above, too.
Any help to update the battery status icon on leftbox to show remaining battery life ( % or hr:min ) adjacent to it ? Now I need to click it everytime to see it. I tried my luck, in vain :)
BTW, your blog is just great !!
Hi,
I tried to modify the ‘autohidetopbar’ extension, because I only want to see the top panel in the Overview screen. I think I only have to edit the lines ‘Main.panel.actor.connect(‘leave-event’, Lang.bind(Main.panel, Main.panel._hidePanel));’ and ‘Main.panel.actor.connect(‘enter-event’, Lang.bind(Main.panel, Main.panel._showPanel));’. The problem is that I don’t know where to connect functions to.
I tried it with things like ‘Main.overview.connect(“showâ€, Lang.bind(Main.panel, Main.panel._showPanel));’, but that didn’t work.
How can I find out where I can connect those callbacks to?
You need to read the source code under /usr/share/gnome-shell/js/ui
Hi,
I just modified “extension.js” as per following:
1. Line 104, change “main” to “init” –> function init() {
2. add the following at the end of file:
function enable() {
}
function disable() {
}
Then modify Line 2 of “metadata.json” to:
“shell-version”: [“3.2”]
Well, it’s kind of working although the top panel is not really hideaway that only the background is transparent and the rest is in very light gray. All windows can be maximized to the top of screen and you still can see topbar in Overview screen.
If you move the mouse cursor all the way to the top of screen (without going into overview screen) you still can use any item on the topbar like checking calender, battery status, changing volume, and etc.
It is not perfect yet but for a person like me who don’t know a thing about java script, this modified extension is now working great.
Hi,
Great info!
I have 2 whiches you might be able to help me:
1) Is there a way to add the ubuntu software center (or any software repository for that matter) to the search result in the activity window?
2) How do I start an application ion the top right hot spot? Like the circular-application-menu (http://code.google.com/p/circular-application-menu/)
Thanks!
Bastiaan
Hi there :-)
i was wondering if you will be updating your theme extension for 3.2 ?
cheers :-)
BB
Really nice,
very cool sharing.